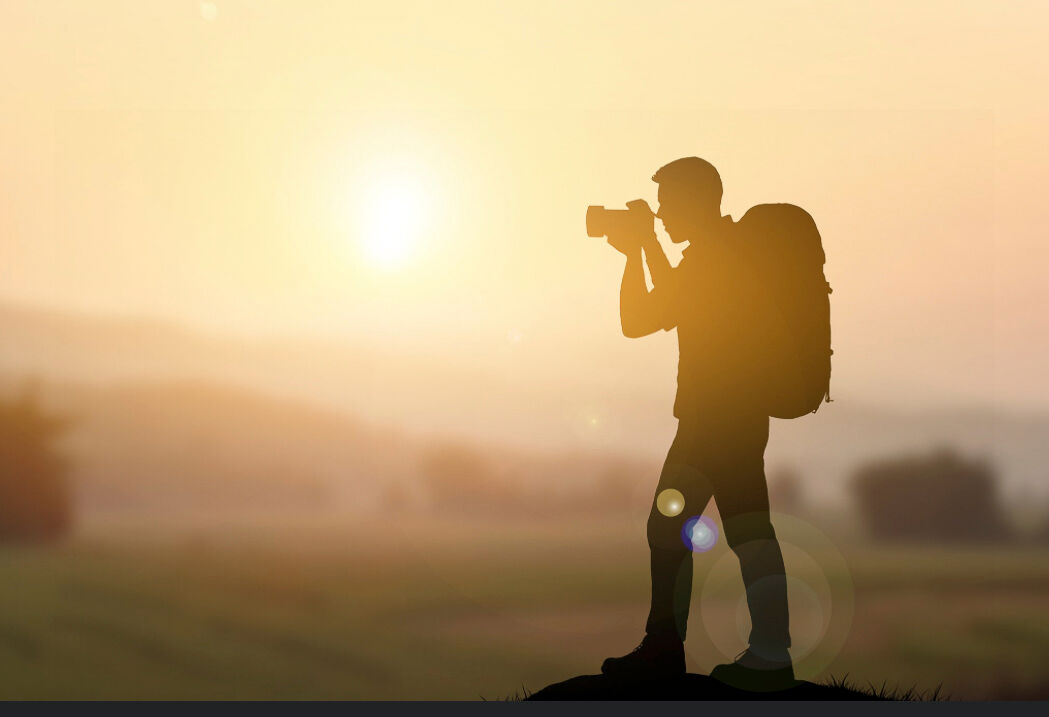
Camera Modes Explained: A Complete Guide for Photographers
Ready to take control of your camera and start creating the images you've always dreamed of? Understanding your camera's modes is the first big step on this amazing journey. It might seem a little technical at first, but we're in this together, and I promise it's simpler than you think!
Think of camera modes as your creative toolkit. Each one gives you a different level of control over your final shot. Moving beyond "Auto" mode is your ticket to telling your own visual stories, from beautifully blurred backgrounds to sharp, action-stopping moments.
In this article, we’ll break down the main modes found on most cameras, so you can understand how each one works and when to use them.
Let's dive in and explore these settings together. By the end of this quick guide, you'll feel confident switching between modes and making your creative vision a reality. I'm so excited to see what you'll create!
If you're brand new to photography, my guide to landscape photography for beginners covers the foundational skills you'll build on as you master each mode.
Why Camera Modes Matter in Landscape Photography
Choosing a camera mode is about telling your camera what creative decision is most important to you for a particular shot. Are you focused on controlling the depth of field to get everything from the foreground flowers to the distant mountains sharp when shooting landscapes? In these situations, using a smaller aperture (higher f-number) is key for greater depth of field. Or are you trying to freeze the motion of a crashing wave or blur it into a silky-smooth texture? Each mode gives you a different level of control over the exposure triangle—aperture, shutter speed, and ISO.
From my perspective as a landscape photographer, mastering these modes is non-negotiable. It’s the difference between just taking a picture of a scene and truly making a photograph. It allows you to adapt to changing light and ambient light conditions, emphasize specific elements, and bring your unique creative vision to life. Relying on Auto mode is like letting someone else paint your picture; learning the modes puts the brush firmly in your hand!
Understanding Camera Settings: The Building Blocks
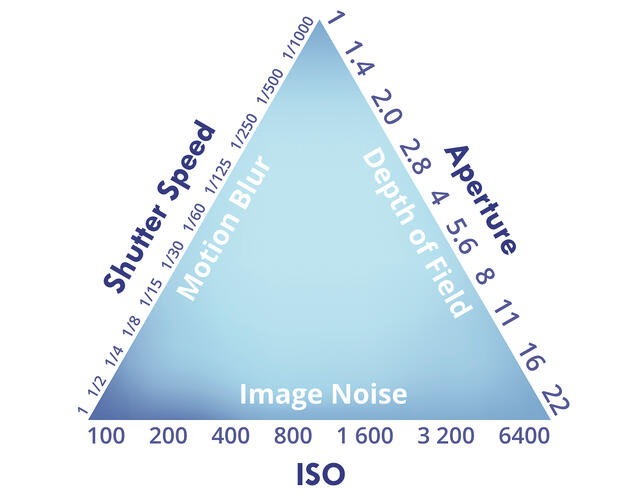
Before we jump into the modes themselves, let's quickly touch on the "exposure triangle." This is just a friendly term for the three core exposure settings your camera uses to control light: Mastering the Exposure Triangle
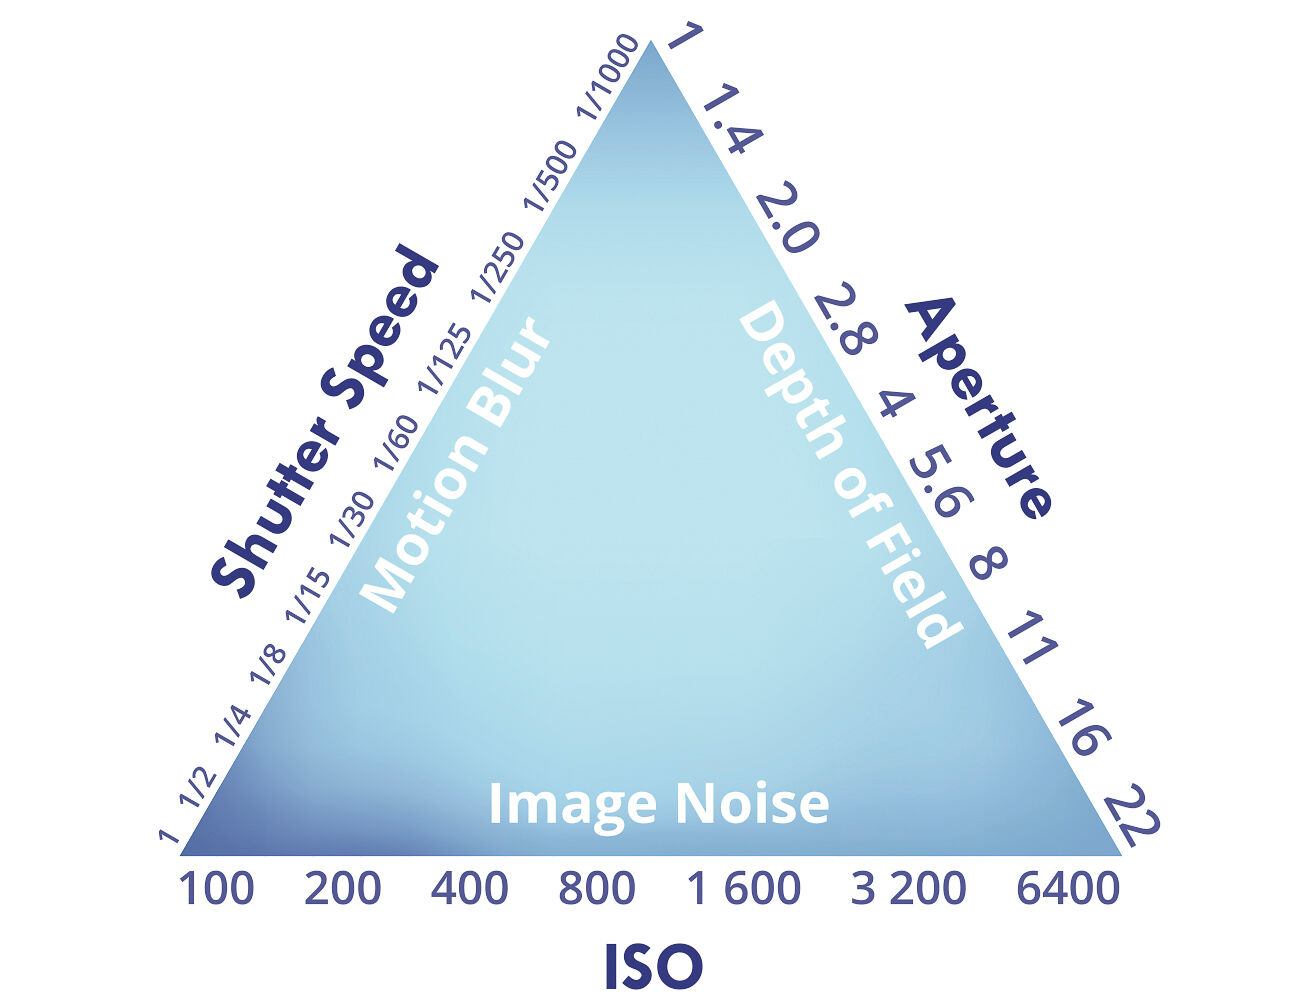
Each camera mode simply changes how you and your camera work together to control these three elements. The goal of adjusting these exposure settings is to properly expose your image, with the camera often aiming for a balanced exposure value. Let’s get to it!
Digital Camera Modes and Shooting Modes
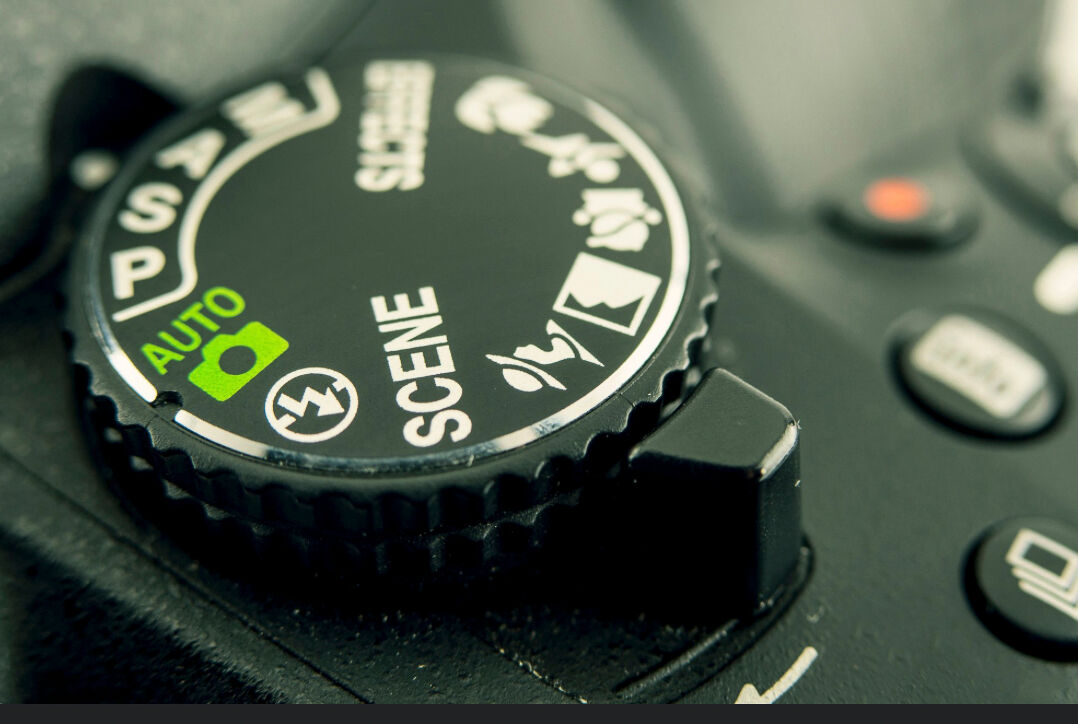
If you've ever stared at that mysterious array of symbols dancing across your camera's mode dial and felt completely lost—you're absolutely not alone, and honestly? That moment of confusion is where the magic begins! Every single digital camera comes loaded with these incredible camera modes, each one designed like a secret key to unlock different photographic possibilities. Understanding these camera shooting modes isn't just technical knowledge—it's your first real step toward joining the ranks of photographers who've moved beyond those quick phone snaps into something that actually captures what you feel when you're behind the lens.
That mode dial—perched right there on top of your camera body like a compass waiting to guide your creative journey—this is where the real photography adventure starts. With just one satisfying click, you're switching between worlds: auto mode, program mode, shutter priority mode, aperture priority mode, and manual mode. Each of these digital camera modes is like having different superpowers at your fingertips, giving you exactly the right balance of control over those crucial exposure elements—shutter speed, aperture, and ISO—that separate snapshots from photographs that make people stop and stare.
- Auto mode is your photography safety net—perfect for those "I just need to capture this moment right now" situations where the camera becomes your reliable partner, calculating every setting while you focus on the shot that matters.
- Program mode gives you that first taste of creative freedom—like having training wheels that let you experiment with different combinations of aperture and shutter speed while your camera ensures you won't accidentally blow the exposure.
- Shutter priority mode is where motion becomes your playground—whether you're freezing a hummingbird's wings or creating those dreamy motion blurs that make viewers feel the movement, you control the shutter speed while your camera handles the technical dance of matching aperture.
- Aperture priority mode puts the magic of depth of field right in your hands—this is where you decide what lives in sharp focus and what melts into beautiful bokeh, while your camera calculates the perfect shutter speed to bring your vision to life.
- Manual mode is the full creative expression—every photographer's ultimate destination where you control both aperture and shutter speed, perfect for those moments when you know exactly what you want and you're ready to fine-tune every single detail of your exposure.
Here's what I love about modern digital cameras—they make switching between these modes so intuitive that experimentation becomes pure joy rather than intimidation. Don't just read about that mode dial—get out there and turn it! Watch how each setting transforms the same scene into completely different stories. The more you play with these camera shooting modes, the more you'll develop that photographer's instinct for knowing exactly which mode will capture not just what you see, but what you felt standing there with your camera. Whether you're facing a sweeping landscape that takes your breath away, a fast-moving animal that demands split-second timing, or a portrait subject whose soul you want to capture—you'll have the confidence to choose your mode and create something extraordinary.
When to Use Other Camera Modes
Photography Tips for Beginners: Your Main Camera Modes
While Aperture Priority and Manual are the workhorses, other modes have their place in a landscape photographer’s toolkit. It’s great to know what they do so you can pull them out when the situation calls for it. Most cameras share a common set of modes, usually found on a dial on top of the camera body, and also let you adjust other settings such as focus mode, exposure, picture styles, and white balance for better results. Let’s walk through the most important ones you’ll use on your photography journey.
Check out my Beginner's Guide to Photography
Full Auto Mode (The Green Box)
This is where most of us start! In full Auto mode—one of the most common automatic modes—your camera makes all the decisions about aperture, shutter speed, ISO, white balance, and even whether to use the flash. All you need to do is press the shutter button, and the camera handles the rest, making it easy to capture a photo in almost any situation.
It’s fantastic for those moments when you just need to capture something quickly without thinking about settings. However, it doesn’t give you any creative control. I encourage you to see this mode as a starting point, not a final destination!
Program Mode (P)
Program Mode (P) is like a smarter version of Auto. In this mode, the camera selects both the aperture and shutter speed for you. However, you can use the command dial to quickly shift through different aperture and shutter speed combinations that will all result in the same exposure. I sometimes use this as a starting point when I arrive at a new scene and want to quickly see what the camera suggests before I switch over to Aperture Priority or Manual to refine my settings. It’s a great mode for street photography or travel shots where you need to be fast and flexible.
In Program Mode, you can also enable auto ISO for convenience, allowing the camera to automatically adjust ISO as lighting changes. Additionally, you can adjust picture style to customize the visual tone of your images, and use exposure compensation to fine-tune brightness if the camera’s automatic settings aren’t quite right. Think of it as Auto mode with training wheels. You can start to influence the look of your photos without needing to juggle all the settings at once. It’s a wonderful way to begin experimenting!
Shutter Priority Mode (S or Tv)
This is where the real fun begins! In Shutter Priority mode, you tell the camera what shutter speed you want to use, and the camera automatically selects the right aperture to match.
Why is this so exciting? Because it gives you control over motion!
- Freezing Action: Want to capture a bird in flight or a splash in the water with perfect clarity? Use a fast shutter speed (like 1/1000s). This is also essential when shooting sports to freeze athletes in motion.
- Creating Motion Blur: Want to make a waterfall look silky smooth or capture the streaks of car lights at night? Use a slower shutter speed (like 1 second or longer) for creative effects. Just be aware that using a slower shutter speed in low light can result in an underexposed image if the camera's aperture can't open wide enough to let in more light.
This mode is a favorite for sports, wildlife, and creative long-exposure photography. I’d love to see you all try it out!
Aperture Priority Mode: The Landscape Photographer’s Best Friend
Aperture Priority Mode (A or Av)
If I had to pick one mode to use for the vast majority of my landscape work, it would be Aperture Priority (A or Av on your dial) without a second thought. This mode is an absolute game-changer, and I encourage everyone to get comfortable with it! In Aperture Priority, you choose the aperture (f-stop), and the camera automatically selects the appropriate shutter speed to achieve a correct exposure. You also set the ISO, giving you control over two of the three exposure elements.
Why is this so powerful for landscapes? Because aperture directly controls the depth of field—how much of your scene is in sharp focus from front to back. For most classic landscape scenes, we want a deep depth of field to ensure everything is tack sharp. By setting my aperture to a value like f/11 or f/16, I’m telling the camera that sharpness across the entire frame is my top priority. Your aperture choice works together with your focal length to shape how the scene is rendered. The camera then does the simple work of figuring out the shutter speed, freeing me up to focus on composition and light.
I remember one incredible morning shooting a sunrise over a mountain lake. When motion becomes the creative priority — silky water, streaking clouds, freezing action — understanding shutter speed in landscape photography helps you decide when to switch from aperture priority to manual or shutter priority mode.
That kind of moment is where settings stop being technical and start being creative — for more on translating gear control into stronger images, see my 10 field-tested landscape photography tips.
The light was changing by the second, and vibrant colors were exploding across the sky. By using Aperture Priority, I could quickly adjust my aperture to ensure both the colorful pebbles at my feet and the distant, glowing peaks were in focus, without fumbling with my shutter speed as the light rapidly brightened. It allowed me to stay in the creative moment and capture a series of keepers instead of wrestling with settings. That’s the magic of Aperture Priority!
- Shallow Depth of Field: Want that beautiful, creamy, out-of-focus background for a portrait? Use a wider aperture (like f/1.4, f/1.8 or f/2.8). This makes your subject pop!
- Deep Depth of Field: Want to capture a sweeping landscape where everything from the flowers at your feet to the mountains in the distance is sharp? Use a smaller aperture (like f/11 or f/16).
Aperture Priority Mode is also popular for shooting wildlife, as it allows you to control depth of field and lets the camera balance the exposure value automatically.
This is the go-to mode for portraits, landscapes, and any time you want to creatively direct the viewer’s eye.
Manual Mode: Taking Full Control of Your Shots
Manual Mode (M)
When you need absolute precision and consistency, Manual Mode (M) is your go-to. In Manual, you are in the driver’s seat for everything. You set the aperture, you set the shutter speed, and you set the ISO. You can also manually adjust the ISO for precise control over exposure, which is especially important in low light or when you want to limit noise. The camera’s light meter will tell you if it thinks your settings will result in a properly exposed image, but it won’t change anything for you. This level of control is essential in specific situations.
Manual Mode is perfect for panoramas, where you need every single frame to have the exact same exposure to stitch them together seamlessly later. It’s also my choice for night photography and astrophotography, where the camera's meter is easily fooled by the dark environment. By setting everything myself, I can take long exposures of 20 or 30 seconds to capture the Milky Way without the camera trying to "correct" the exposure.
It's also invaluable when the light is consistent and you want to ensure every shot is identical. Imagine you’re shooting a waterfall with a polarizing filter. The filter can trick the camera’s meter, so locking in your settings in Manual Mode ensures you get the perfect exposure you want, every single time. It might feel intimidating at first, but with practice, it becomes second nature!
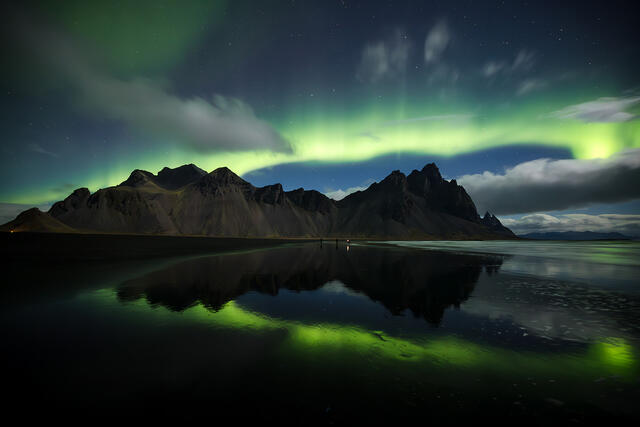
Manual mode is the ultimate goal for many photographers because it provides unmatched control in tricky lighting or when you need absolute consistency from shot to shot. How to Shoot the Northern Lights
Professional cameras often lack the dedicated scene modes found on entry-level models, but they offer custom modes that let you save your preferred settings for quick access—ideal for advanced users who want to tailor their camera for specific situations.
You're Ready to Explore!
The best way to learn is by doing! I wholeheartedly encourage you to grab your camera, switch it out of Auto, and just start experimenting. Try taking the same photo in Aperture Priority and then in Shutter Priority. See how the results differ.
Don't be afraid to make mistakes—every photo you take is a learning opportunity. This is your journey, and exploring these camera modes is a huge and exciting part of it. I can't wait to see the amazing images you all start creating! We will breakdown these settings in more depth in future posts as well other factors that help you capture the best photo possible. Or join one of my photography workshops for hands-on practice in the field.
Share your experiments and questions with our community. We're all here to support and learn from each other!